BrightWork FAQ | Manage a Project
How can I create a project?
- Go to your Project Area, or the Project Office where you want to create your new project.
- Click the settings cog
 in the top right, then click Create Project.
 - Give the project a title and a unique URL will be generated.
- Make any changes to the option to rename the project home link, permissions, navigation, or navigation inheritance you want.
- The Project Manager will default to the logged in user.
- Decide what sort of project you want to create:
- If you want to create a project from a template, click the Browse icon
 next to the Select a Template text box.
 - If you want to copy an existing project, just click the Browse icon next to the Select a Project text box.
- Select a project or template and click OK.
- Choose whether you want to include or configure the template content, then click Create.
How can I add and update tasks?
- Click Tasks Update on the Quick Launch.
- You can add tasks in two ways:
- You can click the
 new task link to open the New Task window.
 - Or, you click the edit this list link to open up your tasks in the Quick Edit view. This view is useful if you want to update many tasks at once.
- You can edit tasks directly by clicking on their title, or by using the Quick Edit view.
Customizing your tasks is easy, and you can add or remove columns to the form using the List Settings page.
How can I add tasks to the timeline?
Once tasks have been added to a project you can include tasks that have a date to the Timeline. There are two ways to do this:
Option 1: Using the Ribbon Action
- Select the Task(s) to add to the Timeline.
- Select the Tasks tab to open the ribbon.
- Select Add to Timeline to add the Task(s) to the Timeline.
Option 2: Using the Task's Menu
- Select the Task's Open Menu ellipsis ...
- Select ADD TO TIMELINE.
Generally it is recommended to include major project tasks only, such has Tasks representing project phases or zero duration milestone tasks.
Timelines appear by default with the Tasks list and on the Home page of BrightWork projects. They can also be added to any web part page in a project site by adding the web part from the Content Rollup category selecting Timeline.
How can I track issues and risks?
Tracking Issues and Risks is simple in BrightWork. To track your issues, you can just click Issue Reports on the Quick Launch. This will take you to a page where all the issues in your project are available. You can report on all open issues, all issues that are in a warning or danger state, overdue, or closed.
To update an issue you can just click its title in the view and then click edit item. Make your changes and click Save.
If you want to flag a task as an issue, just edit the item as usual, and then click the Issue Indicator checkbox and give a description of the issue. This will now appear in your Issue Reports.
In more complex templates you can manage Risks. To do this, just click Risks on the left hand Quick Launch. Now you can edit a list of pre-defined risks or add your own.
How can I schedule my tasks?
BrightWork task lists have a built-in scheduler that lets you keep your tasks in a schedule based on predecessors. You can chain task after task, roll that information up into a summary task, then promote that information to metrics. It's really simple and can automatically calulate using a timer job, so your tasks will always be correctly aligned to your schedule.
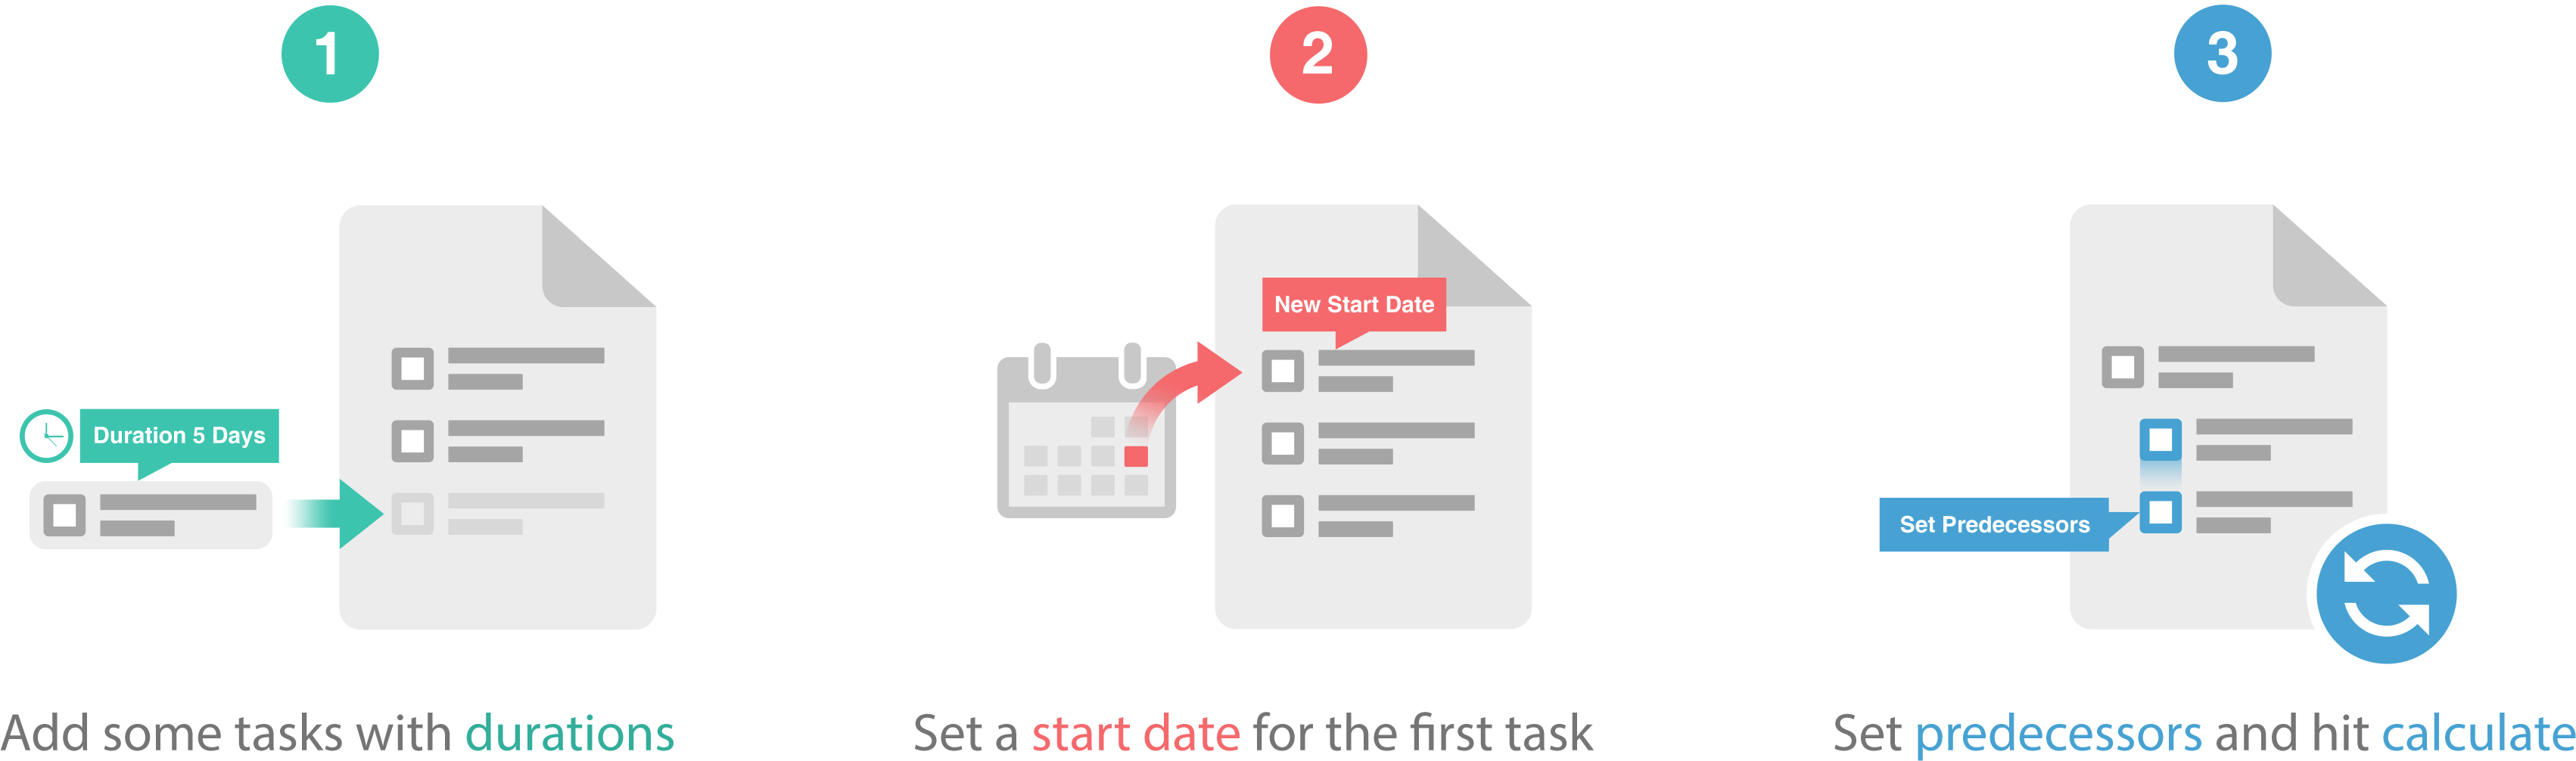
To schedule your tasks:
- Estimate the Duration in days for each task.
- Set a Start Date for the first task and any tasks that will have no predecessors.
- Select Predecessors for tasks that are dependent on previous tasks and click Calculate Schedule in the ribbon.
Your tasks will now have their dates and durations automatically calculated, keeping them in line. A scheduled Timer Job will then make sure they stay in check.
You can also move your schedule using the Move Schedule action in the ribbon and picking a new date to align your schedule around.
How can I sync my tasks with Microsoft Project?
To get Microsoft Project Professional 2013 and BrightWork working together, you'll need to use the Project Structured template for your project. This has a custom project file in its site assets folder that uses a macro to fill out all the special BrightWork columns. If you are using a Project Structured based site, the syncing process is just a few steps.
- Click Tasks Update on the left hand Quick Launch.
- Click the List tab at the top of the page to open the ribbon, then click Open with Project.
- Enter your login details if prompted, and click Enable Macros.
- Make any changes you want in Project and click Save.
How can I schedule an email?
To activate the schedule email feature, your admin needs to enable the scheduled email timer job in Central Administration, but that only needs to be done once. Then you just need to turn on the scheduled email feature in the Site Features of your project.
- Click in your report to show the reporter tab at the top of the screen.
- Click the Reporter tab to show the ribbon and click Advanced Share, then Create Scheduled Email.
- Give the scheduled email a helpful title and set the delivery frequency.
- Pick the user the mail will come from and to whom it will be sent. You can send either to individuals or to anyone who is relevant to the report.
- Enter a subject and body to clarify the mail.
- Once you're happy, click Save.
Scheduled e-mails send according to the timer job settings. If you want to run the email straight away, click in the Advanced Share button and click View Scheduled Emails. Then click the title of the email you want to run and click the Run Email Now button at the bottom of the page.
How can I refresh and update project metrics?
To refresh your project metrics:
- Click Metrics on the Quick Launch, or click the Project Metrics icon in the Site Contents.
- Click the Items tab at the top of the screen and click Update Project Metrics.
- Click OK.
Project Metrics normally run on a timer job so that everything updates at a quiet time, usually in the early morning. Running it yourself is an option if you need to get up-to-the-minute numbers for your project.
To update an individual metric:
- Click the settings icon in the top right of the screen and click Site contents, then click Project Metrics.
- Click on the title of the metric you want to update and click Edit Item.
- Update the Metric Value. To enter a value for a date in the past, change the Apply Metric Value date.
- Once you're finished, click Save.
How can I export a report to Excel?
- Click anywhere in your report to make the Reporter tab appear.
- Click the Reporter tab to open the ribbon.
- Click the Export button and you will have the option to Open or Save the report as an Excel .xls file.
The Share section of the ribbon isn't just for exporting to Excel. You can export to XML, Static Excel, Dynamic Excel, or email the report. If you want a hard copy, just click the Print button.