Add Columns to the Project Cache
The Project Cache is configured to report on Project Statement and Projects Tracker columns and metrics that are included in the out-of-the-box templates. To add new columns or metrics follow these steps:
1. Set Up Source Values
Tip! In most scenarios, we recommend that you create new columns and add their cache mappings in templates. This means you can reuse the same columns and metrics across multiple projects and do not have to configure Project Cache Mapping in multiple projects.
Add Metrics to your project
Existing or new Project Metric values can be mapped to the Project Cache.
Add Column to the Project Statement/Projects Tracker
If you have not already created the new column you need to:
- Click the settings cog
 in the top right and click Site contents.
- To open the 'List Settings' page click the ellipsis
 to the right of the Project Statement or Projects Tracker tile and click Settings in the pop out dialog box.
- Click Create column to create the new column and click OK.
Note: Spaces in column names in SharePoint are returned as _x0020_. This is why it is good practice not to use spaces in column names when creating them. We recommend you create the column name without spaces and save it. Then re-edit the column settings to add any spaces to the column's caption.
2. Column Mapping
2.1 Add Column to Project Cache List
The following steps require Site Collection Administrator access.
When adding a column to the Project Cache list you need to open the Project Cache and create a column of the appropriate type.
- The Project Cache list is a hidden list to help prevent accidental editing, though there are two ways to open the Project Cache list:
- From the Project Cache Mapping page select the 'Project Cache List' link at the top of the page.
- Alternatively, access it by its URL by editing the URL in your browser and pasting bwProjectCache after the site collection name in the URL.
For example, the URL should be something like:https://myserver/sites/mysitecollection/bwProjectCache
- Add the column to the list using the appropriate column type.
Guidelines for creating a new Column in the Project Cache
Project Statement and Projects Tracker
The following rules apply to mapping to the project cache from source columns in either the Project Statement or Projects Tracker:
| Source Column Type | Project Cache Column Type |
| Single line of text |
|
| Multiple lines of text |
|
| Choice |
|
| Choice with 'allow multiple selections' |
|
| Number |
|
| Currency |
|
| Date and Time |
|
| Lookup |
|
| Lookup with 'Allow multiple values' |
|
| Yes/No |
|
| Person or Group |
|
| Person or Group with 'Allow multiple selections' |
|
| Hyperlink or Picture |
|
| Calculated Single line of text |
|
| Calculated Number |
|
| Calculated Currency |
|
| Calculated Date and Time |
|
| Calculated Yes/No |
|
| Choice Indicator Icon |
|
| Number Indicator Icon |
|

Project Metrics
When the source of your data is taken from a metric, then the following are the column types to map to:
| Metric Value Type | Project Cache Column Type |
| Indicator Icon |
|
| Metric Value | Depending on the metric type:
|
| Formatted Metric Value |
|
| Target Value | Depending on the metric type:
|
| Formatted Target Value |
|
| Formatted Danger Value |
|
| Formatted Warning Value |
|
| Formatted Danger Value |
|
| Indicator Status |
|
It is recommended that the same or a similar name be used in the source and Project Cache to make understanding and maintenance easier.
2.3 Mapping a Column to the Project Cache
The following steps require Site Collection Administrator access.
Note: Project Cache Mapping applies to the entire site collection. So even though the mapping is done in a template or project site, it impacts the entire site collection. So when making changes to Project Cache Mapping, it is important to consider the impact of any changes on other sites within the site collection.
- Click the settings cog in the top right and click Site settings.
- Click Map Columns to the Project Cache under BrightWork Settings.
You can then add new column mappings or manage existing mappings.
Tip! If you have not already added a column to the Project Cache List you can open the Project Cache in a new browser tab by clicking on the 'Project Cache List' link at the top of the page.
Project Cache Mapping allows you to map from the Project Statement, Projects Tracker or Project Metrics. The option to select the source list is at the top of the page.
Project Statement

- Project Statement Column
Displays Project Statement column names, with their column types. The page shows Project Statement columns that are:- Visible in Project Statement's forms or views
- Mapped to the Project Cache
- Not in the BrightWork reserved column list
- Project Cache Column
Displays the Project Cache column name that is being mapped to. - Metric Override
When updating the Project Cache, if a mapping for both an active metric and a Project Statement value exist for the same Project Cache column, then the metric value is written to the Project Cache and not the Project Statement value. The Metric Override column indicates that the mapping file is looking for both a metric value as well as a Project Statement value. A 'Yes' indicates that both mappings are possible. If the metric also exists in the site, it will display the name of the metric in brackets.
A good example to help understand this is % Complete. In the Project Lite template, the % Complete value is filled in manually by the project manager using the Project Statement. In a Project Standard template, the % Complete value is a metric and gets updated automatically. Both of these values are mapped to the one % Complete column in the Project Cache.
- Metric Active
If a Metric Override is possible, and the metric exists in the site, this column displays whether the metric is active or not.
'Yes' means the metric exists in the site and is active. In this scenario, the metric's value will be written to the Project Cache and the Project Statement's value will not.
- Remove
Clicking on the Remove button will delete the specific mapping from the mapping file. This can be useful if you make a mistake and need to remove an incorrect mapping.
Caution: Consider the impact on other sites in the site collection before you remove a mapping.Note: If a Metric Override exists, then the 'Remove' option is disabled.
Projects Tracker
![]()
- Projects Tracker Column
Displays Projects Tracker column names, with their column types. The page shows Projects Tracker columns that are:- Visible in Projects Tracker's forms or views
- Mapped to the Project Cache
- Not in the BrightWork reserved column list
- Project Cache Column
Displays the Project Cache column name that is being mapped to. - Remove
Clicking on the Remove button will delete the specific mapping from the mapping file. This can be useful if you make a mistake and need to remove an incorrect mapping.
Caution: Consider the impact on other sites in the site collection before you remove a mapping.Note:
-
Projects Tracker will only be available to select in the drop down list if one exists in the site.
Out of the box, Projects Tracker lists are included in Project Office and Projects and Work Tracker templates. - It is not possible to remove % Complete or % Work Complete from Projects Tracker mapping
-
Projects Tracker will only be available to select in the drop down list if one exists in the site.
Project Metrics

- Metric
Displays the names of Project Metrics that are mapped to the Project Cache, with the metric value type in brackets. To be included in this list the metric must be active in the project site. The metric value types are; Indicator Icon, Metric Value, Formatted Metric Value, Target Value, Formatted Target Value, Formatted Warning Value, Formatted Danger Value, and Indicator Status. See the table above to see which metric value types map to which column types in the Project Cache. - Project Cache Column
Displays the Project Cache column that the metric value is mapped to. - Remove
Clicking on the Remove button will delete the specific mapping from the mapping file. This can be useful if you make a mistake and need to remove an incorrect mapping.
Caution: Consider the impact on other sites in the site collection before you remove a mapping.Note: If a Metric Override exists, then the 'Remove' option is disabled.
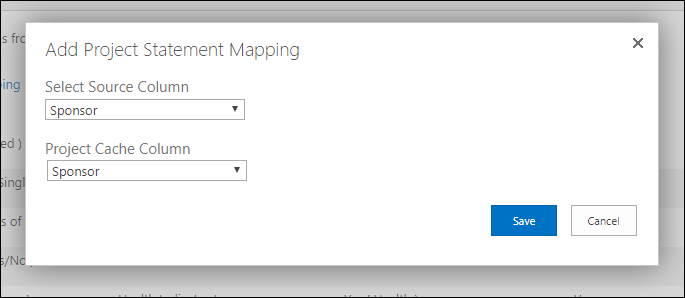
To add a new column mapping:
- Click Add new column mapping.
- Select the Project Statement or Projects Tracker column you wish to map from in the Select Source Column drop-down list.
If no options are available, it means that there is no source to map to the Project Cache. - Select the Project Cache column you wish to map in the Project Cache Column drop-down list.
If no options are available, it means that there is no column in the Project Cache of the correct type available to map to. - Click Save and your mapping will appear in the list of mappings.
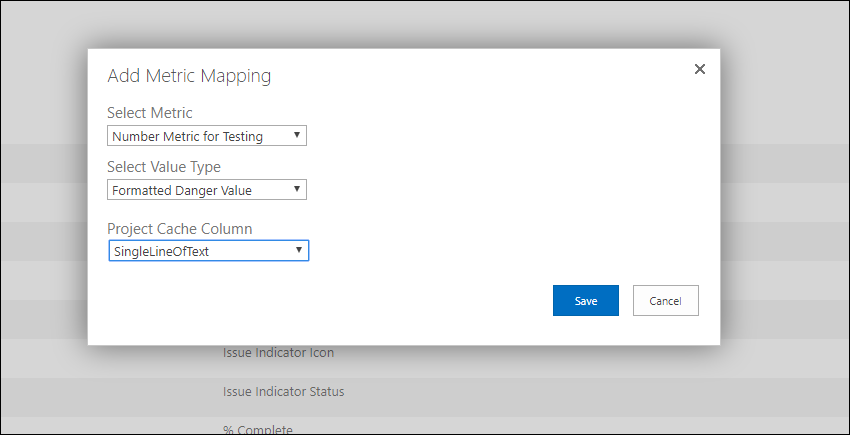
To add a new metric mapping:
- Click Add new metric mapping.
- Select the Project Metric item you wish to map from in the Select Metric drop-down list.
If no options are available, it means that there is no source to map to the Project Cache. - You should also select the Value Type
- Select the Project Cache column you wish to map in the Project Cache Column drop-down list.
If no options are available, it means that there is no column in the Project Cache of the correct type available to map to. - Click Save and your mapping will appear in the list of mappings.
When using the Project Cache Mapping page, only one person can make updates at a time. If more than one change is made at the same time, then you may get an error saying: 'This version is not the latest version of the report'. Should this happen you need to refresh the Project Cache Mapping page and try your change again.
3. Add Column to Cache Report
Finally, add the column to the Shared or Personal report that uses the cache.
Mapping from the XML Mapping File
It is possible but not advisable to manually map items to the Project Cache by updating the ProjectCacheGlobalSettings.xml
Note: This task requires SharePoint Designer 2013 and some experience with working in HTML or XML would be an advantage.
You also need to know how to add columns to lists and understand what a Metric Id is.
You need to be a Site Collection Administrator or a member of the BrightWork Cache Administrator's user group to perform this task.
Update ProjectCacheGlobalSettings.xml
Update the global ProjectCacheGlobalSettings.xml file that maps the column to the Project Cache list column.
- Open the top level site of your site collection in SharePoint Designer 2013.
For example, the URL should be something like:https://myserver/sites/mysitecollection - Click All Files | _catalogs | bwConfigStore | ProjectCacheGlobalSettings.xml.
- Click Edit File to open the file for editing.
- Add a line of code to the appropriate list template.
There are three scenarios:
Add a column in a Project Statement (710) or Projects Tracker (727) list
Example: <Field target="bwPCIProjectId" source="Title" />
With Project Statement (710) or the Projects Tracker (727) lists, you supply the following data:
-
- Field target = the internal column name in the Project Cache list
- source = the internal column name in the Project Statement or Projects Tracker list
Add Metric Item
Example:
<Field target="bwPCIActualStartDate">
   <IfMetric id="ActualStartDate" source="MetricValue" />
</Field>
With Metric items, you supply the following:
-
- Field target = the internal column name in the Project Cache list
- ifMetric id = the Metric ID
- source = the data type generated by the metric that you want to use
Every metric can generate eight pieces of data that you can include: -
- Metric Value (use
MetricValue) - Target Value (use
TargetValue) - Indicator Icon (use
IndicatorIcon) - Indicator Status (use
IndicatorStatus) - Formatted Metric Value (use
FormattedMetricValue) - Formatted Target Value (use
FormattedTargetValue) - Formatted Warning Value (use
FormattedWarningValue) - Formatted Danger Value (use
FormattedDangerValue)
- Metric Value (use
Map both a Metric value and a Project Statement Column to the same Project Cache Column
In certain situations, a piece of project data may be captured by a Metric in one template and in the Project Statement in another template. As when adding Project Metric Joins in the Report Editor, the Project Cache allows you to map both of these values to a single column in a report. If both values exist, active Metrics will take precedence.
Example:
<Field target="bwPCIActualStartDate" source="StartDateActual">
   <IfMetric id="ActualStartDate" source="MetricValue" />
</Field>
To map Metric items to a Project Cache column, you can map the following as needed:
-
- Field target = the internal column name in the Project Cache list
- source = the Metric ID or the internal name of the corresponding Project Statement column you want to map to
- ifMetric id = the Metric ID
- source = the data type generated by the metric
Every metric can generate eight pieces of data that you can include: -
- Metric Value (use
MetricValue) - Target Value (use
TargetValue) - Indicator Icon (use
IndicatorIcon) - Indicator Status (use
IndicatorStatus) - Formatted Metric Value (use
FormattedMetricValue) - Formatted Target Value (use
FormattedTargetValue) - Formatted Warning Value (use
FormattedWarningValue) - Formatted Danger Value (use
FormattedDangerValue)
- Metric Value (use
-
Click Save.
The ProjectCacheGlobalSettings.xml is for specifying global mappings in a BrightWork site collection. Every site also has its own ProjectCacheSettings.xml file.
The Project Cache list supports the addition of calculated columns. You do not need to add these columns to the ProjectCacheGlobalSettings.xml file.
If the column you want to map has a different internal name in a certain site (for example, one project template uses a column called Organization and the rest use a column called Department), update the local ProjectCacheSettings.xml with the appropriate mapping information and it will override the global setting specified in the top level ProjectCacheGlobalSettings.xml file.
Changes to the ProjectCacheSettings.xml file are automatically included in Design Sync. This means that changes to this file should be made in the Template and synced, especially if Design Sync is being used.