Scenario: Add Column to List and Update Report
Note: We recommend that you:
- Use a Training Zone site collection for this exercise as it has the necessary templates and Training Area.
- Create a copy of the Training - Project Standard template in the BIC for the below series of exercises (if you complete the Project Manager Training Guide, you will have a project office to practice in).
- Require reports to be checked out before they can be edited. This means that any changes you make to a report will not be visible to other users until the report is checked in.
Create a Site Column
A site column is a column that you create at the site collection level and can then add to multiple lists in multiple sites. This allows you to update the properties of the column in one place and have the updates replicated in every location that uses the column. The best example of the benefit of this exists is in Choice columns as it allows you to maintain a list of values in a single location.
Note: BrightWork Choice Icon Columns and Number Indicator Icon Columns cannot be added as site columns.
To create a site column:
- Click Home to ensure you are on the Site Collection home page.
- Click Settings
 | Site Settings.
 - Click Site Columns.
- Click Create.
- Call the column Country and select the Choice option

- Select New group and enter your initials into the text box.
- Enter Ireland, France and USA into the choice text box and ensure to type each item on a separate line.
- Click OK.
Add Site Column to List in Template
To add a column to a list:
- Click Templates Area on the Top Link bar.
- Create a copy of the Training of the Training - Project Standard template
- Click Issues Update on the Quick Launch.
- Click List | List Settings.
- Scroll down and click Add from existing site columns.
- Add the Country column and click OK.
Create Training Project Office in Training Area and Add Content
If you have already created a training project office in the BIC Training Area, you should use that; otherwise, create a project office and create a project site using the Training - Project Standard template you just added the site column to.
- Click Issues Update and create three list items, each with one of the Country choices selected.
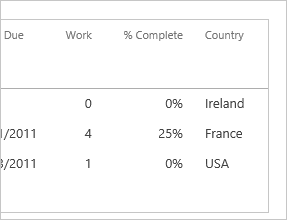
- Click Issue Reports on the Quick Launch; you should see the three items you created in the displayed report.
- Click in the report header and click the Report tab on the ribbon.
- Click Configure Reporter Settings on the Reporter ribbon to open the Reporter Settings page.
- Scroll down to the Columns section of the report - you will notice that the column you just added does not appear here - you will shortly be remedying this!
- Make note of the name of the report (in this case it should be the Open Issues report).
Create a Copy of Report File
Next you will create a copy of the report you just viewed.
- Click Home, then click Site Contents.
- Click BrightWork Reporter Library.
- Click Files | New Document.
- Give the report a name (e.g. Custom Open Issues).
- Select Copy an existing Reporter Definition from the BrightWork Server Gallery and select the report you want to copy (in this case it is the Open Issues report).
- Click Create.
Add Column to Report File
Next, you will add a column to the report file. This will enable you to select the column on the Reporter Settings page and include data in the column in the report.
- Select the report and click Files | Report Editor.
- Click Add a new column.
- Enter the name you gave the column in the Column Internal Name field (in this case it was Country).
- Enter the name you gave the column in the Caption field (in this case it was Country).
- Select Choice (menu to choose from).
- Ensure Add this column to the List Query Templates is selected.
- Click Create.
Add Column to Report
Next, you will add the column to an instance of the Reporter web part.
- Return to the Issues report you viewed earlier and click Configure Reporter Settings on the Reporter web part menu.
- Select BrightWork Reporter Library and select the report you just created.
- Scroll down to the Columns section and select the column you added (Country).
- Click OK.
- Click Close and check in the report.
The column should now appear in the report!
Note: Next, you should complete the Add a Filter to a Report scenario.