Project Status Reports - Workflows
Note: Earlier versions of the Project Status Report list used workflows to pull data from the Project Metrics and Project Statement lists. This method has been superseded by a column mapping feature.
The following article describes the older version of using workflows for maintenance purposes. This is legacy material and is not supported.
Create a Project Status Report
The Project Lite, Project Standard and Project Structured templates include a Project Status Report list (created using the BrightWork Custom list). You can use this list to maintain a record of the project's progress.
The list can pull data from the Project Metrics list or the Project Statement list.
To create a Project Status Report:
- Ensure the Metric list is up-to-date by doing a manual recalculation.
- Click Status Reporting on the Quick Launch.
- Click Add new item.
- Fill out the form and click Save.
- Ensure the Metric list is up-to-date by doing another manual recalculation.
Template Metrics Pulled by the Workflow
The Metrics pulled in the Status Report by the workflow depend on the template in question:
Project Lite
- Time - this updates the Current Finish Date in the Status Report
- Time Indicator Icon
The details added to the Health Indicator and %Complete columns in the Status Report in turn feed the Health and %Complete metrics in the Metrics list.
Project Standard
- Time Current Finish Date
- Time
- Issues
- Health
The details added to %Complete column in the Status Report in turn feed the %Complete metric in the Metrics list.
Project Structured
- %Complete
- Current Finish Date
- Customer Satisfaction
- Health Indicator Icon
- Quality Indicator Icon
- Time Indicator Icon
- Issues Indicator Icon
- Process
- Risk Indicator Icon
- Scope Indicator Icon
- Team Satisfaction
Modify Project Status Report Workflow
The Project Status Report list includes a workflow that pulls data from the Metrics list every time an item is created in the list and populates the list item with this data. You can easily modify this workflow to pull additional information, for example from Metrics you create yourself or from other Metrics in the metrics list.
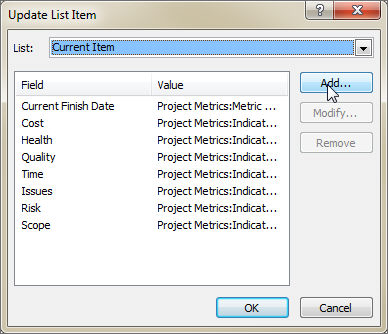
The Metrics pulled in the Status Report by the workflow include:
- Current Finish Date
- Health
- Quality
- Time
- Issues
- Risk
- Scope
SharePoint Designer 2013 is required to complete this task. Click here to download a free copy from Microsoft.
Your SharePoint environment needs to be properly configured to allow use of SharePoint Designer.
This topic assumes that you have added a Metrics list to the site and created the destination columns in the Project Status list for the extra metrics you want to capture.
The destination column in the Project Status list must be of the same type as the data you want to pull from the Metrics list. Generally, the only columns you will want to pull will be either the Metric value column (Date and Time, Number or Currency), the Metric Indicator Icon (Hyperlink or Picture, with Picture selected in the Format URL as menu) and the formatted metric value columns (which should be a Single line of text column).
You will also need the Metric ID of the metric you want to capture.
Modify the Project Status Report Workflow
- Click Status Reporting on the Quick Launch.
- Click List Edit | List
- Click Workflows on the SharePoint Designer Site Objects menu.
- Click Project Status Capture
- Click Edit Workflow.

- Click Current Item.
- Click Add.
- Select the column you want to populate from the Set this field menu.
- Click the formula button.
- Select Project Metrics from the Data source menu.
- Select the metric column you want to pull data from in the Field from source menu. Generally, the only columns you will want to pull will be either Metric value (Date or Number), the Metric Indicator Icon and the formatted metric value columns.
- Select Metric Id from the Field menu in the Find the List Item section.
- Enter the Metric ID in the Value field.
- Click OK.
- Click OK if you see this message.
- Click OK, and OK again.
- Click Publish if you are finished.
Add Project Status Report to a Project
The Project Status report list and workflow available in the Project Standard and Project Structured site templates can be added to another template or project (called a destination site in the steps below). The workflow captures a snapshot of the metrics list and writes it to a list item. This is to facilitate a project snapshot history.
The high-level steps for this are:
- Add the Metrics List to the destination site, if it does not already exist in the destination site.
- Create a Project Structured template from a site definition.
- Save the Project Status list in the Project Structured template as a list template and add this list to the destination site- see here for more information.
- Create a list workflow associated with the Project Status list.
- Click the link to the Project Status Report list on the Quick Launch.
- Click List | Workflow Settings | Create a Workflow in SharePoint Designer.
- Give the workflow a name (e.g. Project Status Capture), a description (optional) and click OK.
- Click Update List Item on the Action menu.

- Click Add.
- Select the column you want to populate from the Set this field menu.
- Click the formula button.
- Select Project Metrics from the Data source menu.
- Select the metric column you want to pull data from in the Field from source menu. Generally, the only columns you will want to pull will be either Metric value (Date or Number), the Metric Indicator Icon and the formatted metric value columns.
- Select Metric Id from the Field menu in the Find the List Item section.
- Enter the Metric ID in the Value field.
- Click OK.
- Click OK if you see this message.
- Click OK, then OK again.
- Repeat Steps 6 to 15 until you have added the columns you want to appear in the Status Report.
- Click Transition to a stage and select Go to a stage from the Action menu.
- Select End of Workflow from the stage menu.

- Click Workflow Settings.
- Select Start workflow automatically when an item is created.
- Click Publish if you are finished.